9 Steps To Leasing Out Your Rental Property In 2021 (Plus Tips For Social Distancing)
These links are being provided as a convenience and for informational purposes only; they do not constitute an endorsement or an approval by Elevate Realty of any of their products, services or opinions.
1. Take Photos Of Your Unit
Instead of going in person to shop around, many renters are cautious and may reduce visits to properties to those that they are seriously interested in. Even if your property is nice, you may miss out on potential renters if your ad isn’t attractive. So make sure you take good quality photos of the inside and the outside! You don’t need fancy equipment for nice photos, but here are a few things you should note:
- Clean up your unit: Sweep, organize, and clear away any messes before taking photos to put your best foot forward.
- Check your equipment: Got blurry photos? It’s might be because your lens is dirty! Check that your lens is clean and charge up your batteries before you get started.
- Turn on the lights: A bright space makes a huge difference. Take pictures in the daytime with all curtains open and lights on to make your unit shine.
- No photobombing please: If tenants are in the unit, kindly ask them to move out of the way when you take the photos. Don’t forget yourself and pay attention to your own reflection when taking photos around mirrors and reflective surfaces.
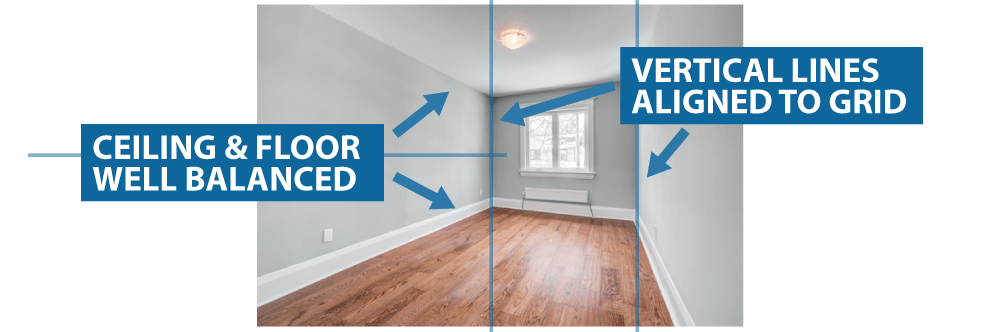
- Pay attention to your composition: Your photos don’t have to be perfect but try to get a good balanced perspective of the room, keeping vertical lines aligned as straight as possible in the photo.
2. Film A Virtual Tour
If a picture is worth a thousand words, what’s a video worth? A virtual video tour is highly recommended to grab the attention of more renters.
- Before You Film: You’ll need a similar setup to photos (see above) and before you film, test your mic and open all the doors in the unit so you can easily move from room to room.
- While Filming: Try to walk slowly and with a steady hand on the camera. Start from the outside and work your way into the unit, capturing all the important elements of the property.
- Showcasing Your Video: Most online listings sites do not upload video files since they can be big. One option is to create a YouTube account so you can upload an unlisted video there. Then, include a link to the video on the listing, so only people who have a link to the video can view it on Youtube.

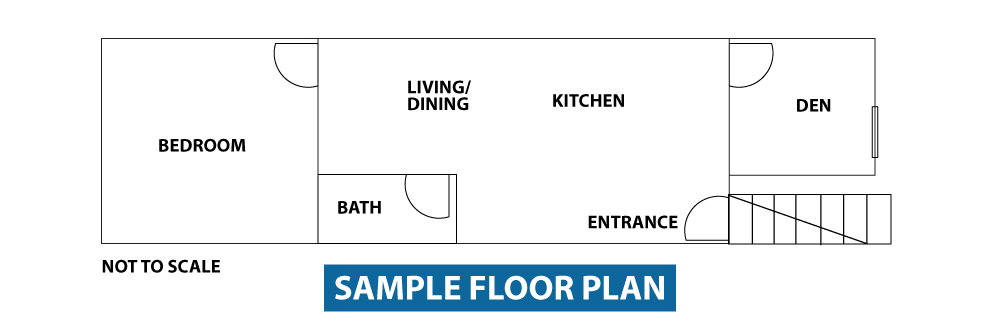
3. Draw A Floor Plan
4. Advertise Online
After you have your images and videos, post your ad online on platforms like Facebook Marketplace, Zumper, and Kijiji. Rents may change frequently, so check other listings in the area at the time of posting to get a sense of what your competition is listing similar units out for. If you’re in an area with less renters, consider paying for ads to increase exposure. Pay attention to your ad copy and include the following information:
- Property address
- Monthly rent
- Square footage of unit
- Number of rooms and bathrooms
- Other attractive features
- How to get around by car and public transit
- Neighbourhood amenities
- Rent start date
5. Prequalify Leads
You might be used to showing the property first, but things are different now. We recommend prequalifying renters before a showing to minimize unnecessary in-person contact. Things you might want to check with each lead at this point are:
- Number of tenants
- Pets information
- Job, income, and any financial impacts or subsidies due to COVID-19
- Reason for leaving their current place of residence
It can be harder to get leads to disclose information prior to a visit, so here are some tips:
- Be responsive and respectful: The quicker you respond, the higher the chance that things will move quickly. Responsive and respectful landlords are attributes that great tenants look for in landlords, and this will leave a good first impression.
- Be flexible with communications: Some renters prefer talking by phone, others like messaging and some others by email. For example, if you don’t hear back by email, try giving the lead a call to get more information.
6. Conduct In-Person Showings
Once you’ve narrowed down your qualified leads, it’s time to schedule in-person showings. Here’s how you can be more mindful of social distancing during showings:
- Space out showings: If you’re thinking of conducting showings in one session, space out each visit at least 10 minutes apart so there’s only one party of visitors at any time. Consider using scheduling apps like Appoint.ly to help you coordinate bookings on a real-time basis.
- Reduce gathering size: Be respectful of the number of people gathered in the unit. If your tenant is willing to open the doors for potential renters, then you might not need to physically be there. Similarly, potential renters should limit their party size to only key decision makers and not take friends and family to the showing.
- Open all doors and turn on all lights: To reduce in-person contact, open all doors, cabinets, curtains, and turn on all lights prior to viewings to eliminate the need for visitors to touch anything.
- Wear masks and gloves: Request for everyone, including yourself, to wear face coverings and gloves during the visit.
- Maintain social distancing: Remind everyone to respect social distancing and stay away from others at all times.
- Minimize talking: Avoid talking inside the unit. Address urgent questions outside the unit and leave other questions to be discussed by phone.
7. Review Supporting Documents
Once you’re ready to move forward, it’s time to verify your renter’s information, such as proof of income, credit scores, and references, which can be sent to you digitally. Since this can contain sensitive and confidential data, we recommend using encrypted file sharing channels like Google Drive or Dropbox.
8. Complete The Lease
To start the lease, you can download a digital copy of the standard Ontario Tenancy Agreement from the government’s website. At this time, you should also prepare other schedules that you find necessary, such as:
- Additional tenant and landlord responsibilities
- Guarantor agreements
- Fire and safety policies
- Lost and damage policies
A tenant might not have a printer or a scanner, so signing a lease digitally can be trickier without special tools. We’ve been using electronic signing platforms for many years and have found this to be the most effective method for most people. You can check out paid and free options online, such as Authenisign and Signrequest.
Money transfers can also be sent digitally, and our preference is by email money transfer. As an alternative, your new tenant can also deposit money into your bank account directly at a bank branch closest to them if you give them your bank account information including your full name, bank number, transit number, and bank account number.
9. Coordinate The Move-In
To minimize in person contact, perform a property inspection in advance, then place keys in a secure lockbox located on site. On the day of move in, send the lockbox code to your tenant. As an added option, you can have them digitally sign off once they move in to confirm the move-in condition and key receipt.
How We Can Help?
Although it requires a bit of learning, this digital transformation of the leasing process can be more efficient in the long run while also respecting the need for social distancing.
If you prefer to have the professionals deal with leasing out your investment property, our leasing team would be happy to help. Please reach out to us with your needs, and we’d be happy to chat!